Wednesday, June 19, 2013

Have you heard of subscription boxes? If you love makeup and you like to try new products then this is the way to go! I am subscribed to Birchbox, Ipsy, and Beauty Box 5, and this is my second month as a subscriber to these companies, so this is very new to me. I also just subscribed to Love with Food; they send little snack packs of new products every month.
 
I just had to blog about Ipsy's June bag because the value of everything that I received was AMAZING and I am SO excited to share it with all of you!
 
The cost to subscribe to Ipsy is only $10 per month and you can cancel anytime. You get a small cosmetic bag and 5 products shipped to your mail box in a hot pink envelope every month! What a deal! Here's what I got...in a leopard print bag, can it get any better??


Let's look at each item and value alone.
 
 
Starlooks Lip Line in "Tickle me Pink"
Retail Value - $12.00
 
 
Product - NYX Mosaic Powder in "Dare"
Retail Value- $7.00


Product - JCat Beauty Sparking Cream Palette #107
Retail Value - $4.49


Product- Chella Ivory Lace Highlighter Crayon
Retail Value- $18.00


 Product- Cailyn Line Fix Gel Liner in "Iron"
Retail Value- $21.00
 
 
That's a RETAIL value of $62.49 for only 10 bucks! I think I will continue to subscribe :)
Get your Ipsy Glam bag here www.ipsy.com


I am in the no way affiliated with Ipsy, nor do I get anything for free...just a happy customer.

Monday, June 10, 2013

Simple Kid's Room Organization

I can't take credit for this idea, but I really wish I could! There are SO many uses for these clear hanging shoe organizers.

Reasons why they rock-

1. Budget friendly way to organize.
2. Everything has a "home".
3. The see-through compartments make finding what you need a breeze.
4. Can be used for accessories, make up, odds and ends, bathroom items, and even in the kitchen pantry.
5. OCD (me) friendly :)

If you want to jazz up your clear compartment storage you can add jewels, flowers, or stickers. I added labels using Word on my computer and white card stock. I used a different color for each category and used a pretty font. Cut out each category and tape on the inside of the compartments using packing tape. (Packing tape is also a cheap way to laminate small items...future tutorial to come!)

Happy Organizing!!


Friday, June 7, 2013

DIY Tutorial: Easy and Inexpensive House Warming Gift Basket

Recently, I needed a quick and easy housewarming gift to put together for my brother and his girlfriend when they moved into their first condo together. I chose to give cleaning supplies in a cute gift basket, because I know from experience when moving into a new place, cleaning products are usually the most important, yet most forgotten items to purchase. I will run through the step by step process of how I put the gift basket together. Remember that you can customize the gift by using any products you'd like, the colors of the basket or tissue paper, or even adding in a gift card as a bonus surprise for this lovely gift basket receiver!

Step 1: Collect your gift basket items. To make it even more inexpensive, shop your local sales and use   coupons from your Sunday paper, or coupons.com. The products I used:

                  Air Wick air freshener spray
                  Lysol Wipes
                  Clorox Toilet Bowl Cleaner
                  Glass Plus glass cleaner
                  Dawn dish detergent
                  Cotton scented candle
                  Microfiber Towels


Step 2: Find a basket big enough to hold and display your items. Luckily, I had one on hand but you can find pretty and inexpensive baskets at Michael's, Hobby Lobby, or even yard sales. 


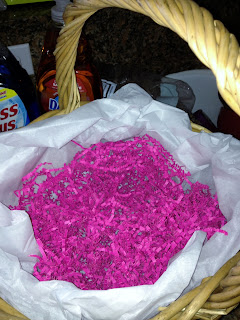
Step 3: Line the bottom of the basket with tissue paper. I used white, but you can customize it with any color.


Step 4: Find shredded paper confetti to use at the bottom of the basket. I made this gift around Easter time so I was able to find it at Walmart for about $1. 


Step 5: Fill the bottom of the basket with confetti.


Step 6: Arrange all of your items in your gift basket so everything is visible. 


Step 7: Gather the supplies to wrap your gift basket. I found this kit at Walmart for $3 in the craft section. It included 2 cellophane gift basket bags, glue dots, gift tags, 2 gift bows, and extra shredded paper confetti. You can use the glue dots to glue any of your items in place in the basket if you are having trouble getting it to stay displayed.  


Step 8: Gather the cellophane at the top of your basket, it helps if you have someone else do it that way you can get the bow around it to be tight and secure. 


Step 9: Tie your bow and gift tag at the top.


Step 10: Admire your finished product!